Can you schedule an email in Gmail? Yes!
Gmail users can easily schedule emails to be sent at a later time. This is particularly useful for those communicating across time zones, organizing email marketing campaigns, or seeking to avoid sending messages over the weekend.
If you want to learn how to schedule an email in Gmail, you’ve come to the right place! Be it via your desktop, iPhone, or Android smartphone, this complete step-by-step guide shows you how to schedule your emails to be sent at a time of your choosing by using the schedule email feature in Gmail.
We will also show you how to edit or delete your scheduled emails.
Keep In Mind: Google enforces daily limits on sending emails to “keep systems healthy and accounts safe,” as their policy reads. For regular user accounts of Google Workspace, the daily sending limit is currently set at 2,000 messages.
If you are using the multi-send feature, which allows you to send the same message to multiple recipients, the limit is slightly lower at 1,500 messages per day. For a trial account, the daily sending limit is 500 messages, the same as that of a personal Gmail account.
Scheduling an Email from a Computer/Desktop
Scheduling emails in Gmail on a computer is a straightforward process. In this guide on how to schedule an email to send later in Gmail, we will provide step-by-step instructions using a Mac as an example.
The same method can be applied to other PCs, such as Windows, as long as the Gmail app is installed. The same steps apply when accessing Gmail via a browser–on Mac or Windows OS.
How to schedule an email in Gmail on Mac
The Gmail schedule email tool is as simple to use as it could be. Scheduling an email for a later time takes just two extra clicks compared to a regular send.
Here’s how to use the scheduling tool:
1) Access the Gmail main menu through your web browser
2) Click the “Compose” button in the top-left of the screen
3) In the pop-up box for writing the email, there is a dropdown arrow next to the “Send” button. Press this, then “Schedule send.”
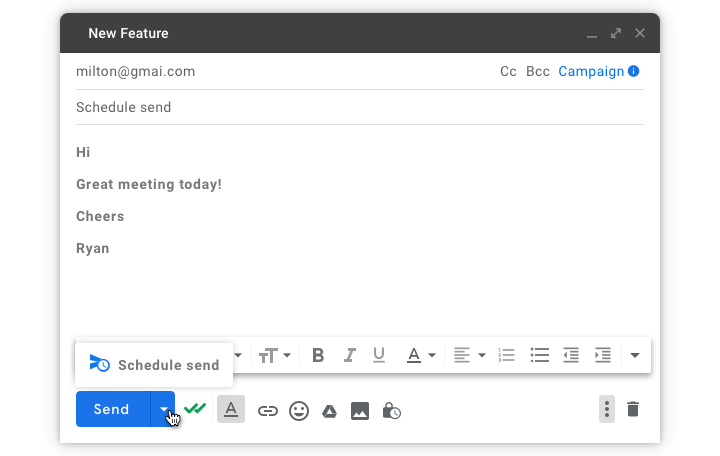
4) You’ll now see the options for when you want the email to arrive.
Either choose one of the suggested options or click “Select data and time” to choose exactly when you want your email to arrive. Once you click an option, the email will be scheduled to be sent later.
Edit or Cancel a Scheduled Email in Gmail on Mac
Editing and deleting scheduled emails is just as simple as scheduling them. If you’ve had a change of heart, need to update information, or notice a spelling error, you can easily make modifications before the email is sent.
As long as you access the email before it’s sent, you have the freedom to make any necessary changes or even delete the email.
To edit or cancel a scheduled email in Gmail on a Mac computer, follow these steps:
- Open the Gmail app on your Mac.
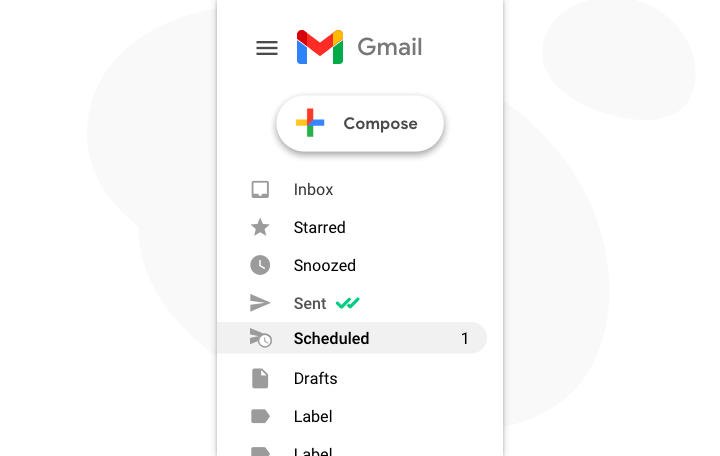
- In the left sidebar, click on the “Scheduled” label to access your scheduled emails.
- Locate the email you want to edit or delete from the list.
- To edit the email, click to open it in the composition window. Make the necessary changes to the content, recipients, or any other details.
- Once you have finished editing, simply close the composition window, and the changes will be saved automatically.
- If you want to cancel or delete the scheduled email entirely, hover your mouse over the email in the list and click on the “Cancel send” or “Delete” option that appears. At this point, the email will transition into a regular “Compose email,” which you can modify or discard. Here, you can make any changes to the email you want, delete it entirely, or simply leave it in the Drafts folder for when you’re ready to return to it.

Note: After you’ve accessed your scheduled emails, you can select multiple scheduled emails and delete them all at once.
Scheduling Email on Gmail Via Mobile (Android and iOS)
Whether you are using Gmail on your smartphone or tablet, you can easily schedule an email, make edits if required, or delete it altogether—pretty much like how you would on a desktop computer. This flexibility allows you to manage your scheduled emails effortlessly, no matter what device you are using.
How to Schedule an email on Gmail via Android Devices
- Open the Gmail app on your Android phone by tapping the Gmail button.
- On your inbox, locate the “Compose email” button (a multi-colored plus sign) positioned at the bottom-right corner of the screen. Tap it to begin composing a new email.
- Once you have drafted your email, tap the button with three dots in the top-right corner of the screen. Select “Schedule email” from the options that appear.
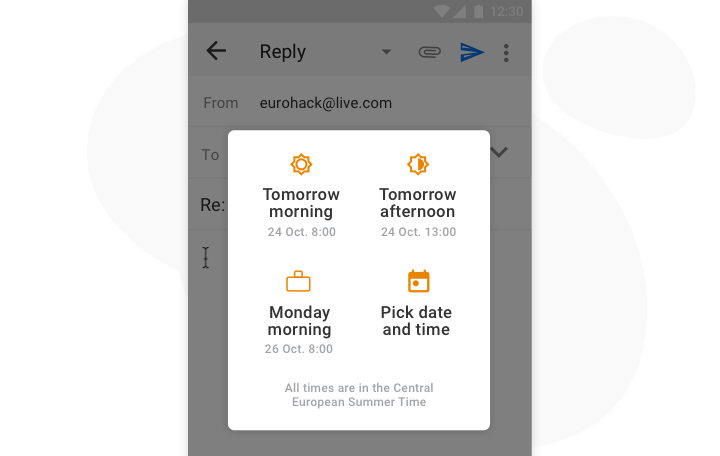
- You can choose from the provided scheduling options or tap “Pick time & date” to set a specific time for the email to be sent.
- After selecting a scheduling option, the email is set for sending. If you realize you need to make changes or delete the email before it is sent, you can find the scheduled email and perform the necessary edits or deletions.
Edit or cancel a scheduled email on Android devices
Here are the steps to follow to edit or delete a scheduled email from your Android device, should the need arise:
1) On your Android device, open the Gmail app
2) In the “Scheduled” mailbox, find the email you wish to edit or delete and open it.
3) With the email open, you will see a box between the details and the body of the email. This box shows when the email is scheduled and has an option for “Cancel send.”
4) Press “Cancel send.” The email will not be sent and transferred to the “Drafts” folder.
Clicking this will remove the scheduled sending of the email. Instead, the email will open in the standard email composition box and can also be found in the Drafts folder.
Here, you can make any changes to the email you want, delete it entirely, or simply leave it in the Drafts folder for when you’re ready to return to it.
How to schedule an email in Gmail on iPhone
1) Open the Gmail app on your iPhone.
2) Press the “Compose email” button (a multi-colored plus sign) in the bottom-right of the screen to write your email.
3) Once the email is written and ready to be sent, press the options button (three dots) next to the “send” arrow in the top-right of the screen.
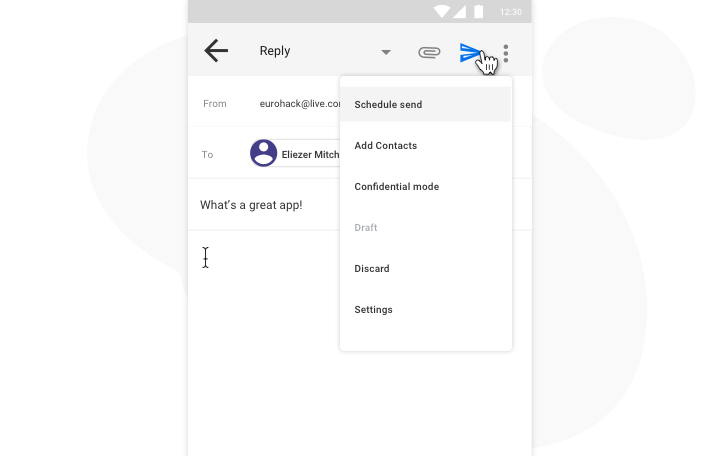
4) From these options, press “Schedule send.” Here, you can choose when you want the email to be sent from a list of suggested times, or you can press “Pick time & date” to choose the exact date and time of arrival. Press the option you want, and the email will be scheduled to send later.
Edit or cancel a scheduled email on iPhone
If you’ve made a mistake in your scheduled email and need to change it on your iPhone before the email goes out, no worries! Just follow these simple steps:
1) Open the Gmail app on your iPhone.
2) Find the scheduled email you wish to cancel. It can be found in the “Scheduled” folder in the main menu between “Sent” and “Drafts.”
3) Open the email, and you’ll see an option for “Cancel send” in a text box just underneath the details of the email.
4) Press “Cancel send,” and the email will be moved to the “Drafts” folder. In addition to removing the email from scheduled sending, it’s now ready to be edited however you wish and won’t be sent until you hit ‘send.’
The email will open in the standard email composition box and can also be found in the Drafts folder.
Here, you can make any changes to the email you want, delete it entirely, or simply leave it in the Drafts folder for when you’re ready to return to it.
How To Schedule a Recurring Email in Gmail
Scenarios may always exist for scheduling recurring emails in Gmail. Unfortunately, Gmail, at the time of writing this, does not have an in-built feature to schedule recurring emails. That said, there are ways to go about it.
There are purpose-built, paid Chrome and Gmail apps that provide a convenient way to schedule recurring emails. These specialized apps offer advanced features and seamless integration with Gmail, making the process more efficient.
Interestingly, some of these apps are also compatible with Android and iPhones. It is essential to check their compatibility before you purchase a subscription.
They typically offer a user-friendly interface where you can set the frequency, interval, and other parameters for the recurring emails. This ensures that your emails are sent automatically at the specified periods, saving you time and effort.
Furthermore, these apps often provide additional functionalities, such as customization options, email tracking, and analytics. They can enhance your email management capabilities and help you streamline your communication workflows.
When exploring paid Chrome or Gmail apps for scheduling recurring emails, consider factors like user reviews, ratings, and compatibility with your devices and operating systems. It is also beneficial to review the specialized features and pricing plans offered by different apps to find the one that best suits your needs.
The Best Way to Schedule an Email to Send Later in Gmail
Whether you’re sending scheduled emails, recurring ones, or a regular message, it is crucial to know if and when your recipients have read them. In fact, this knowledge allows you to make your scheduled and recurring emails more strategically timed, enhancing the delivery and effectiveness. This is where Mailk comes in.
Mailsuite is a powerful tool that provides email tracking capabilities for Gmail. By sending real-time updates about when the recipient opens your emails, Mailsuite helps you gauge engagement, follow up efficiently, and adjust your email communication strategies accordingly.
Take advantage of Mailsuite today and supercharge your email tracking capabilities for better-informed decision-making and improved email performance.

